Please note that the information in this post is based solely on my direct experience and individual usage, and is current to my knowledge as of August 2019. Please reach out in the comments if you spot errors. The software providers listed frequently update the functionality and design of their products. Be sure to test out each option to see how it works for you before purchasing.
I’m not a graphic designer, by any stretch of the imagination. But as a working writer who does most of her own marketing, I’ve learned a thing or two. And there are some basic design tools I find useful for quickly editing pictures, creating social media graphics, and playing around with visual ideas for inspiration.

And while I unequivocally recommend investing in a professional book cover designer before taking your book to market (if you’re self-publishing), sometimes being able to sketch out a digital cover concept lets me home in on the genre and mood of a story, and even helps me to visualize potential titles. (Sometimes the title in my head doesn’t work in the context of a cover.)
If you have a clear vision for your book cover or a fun idea you want to share with your designer or publisher, it’s sometimes helpful to be able to create your own mockups for inspiration. Bear in mind, however, that we authors are almost always limited in our ability to conceptualize commercial covers for our own work. The objective, seasoned eye of a trusted design professional will almost always give better results for the reader than anything we might come up with on our own.
A few basic graphic design skills and tools can also help you work with the designs your book cover artist provides. Many designers will include 3D renderings and various versions of your book cover at little or no additional cost. Some will even provide basic graphics for ads on social media sites. Being able to work with those pieces to create your own posts, ads, etc. can save you lots of time and money in the long run.
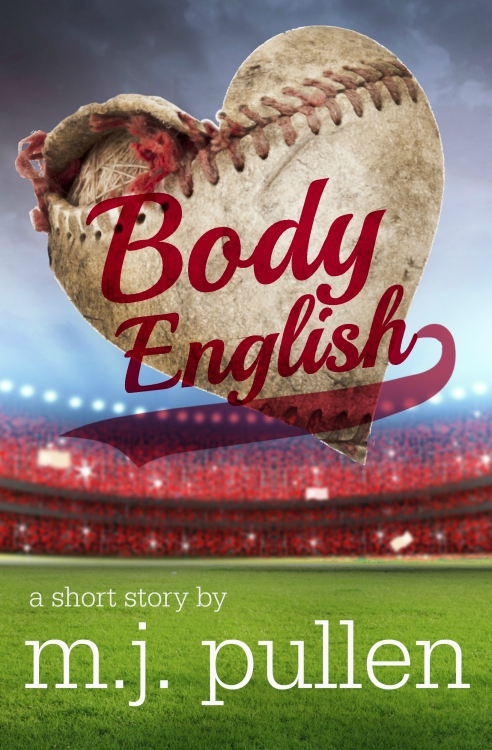
With a few tricks I gleaned from my former marketing career and working with patient, talented designers — I’ve even designed my own covers for and handful of short stories and lead magnets over the years. For example, I spent a few hours on a Saturday creating this simple cover for my free short story, Body English. While it wouldn’t hold up as a retail cover (I’d pay a real designer if I were planning to sell this as a book), it’s served its purpose as a lead magnet nicely.
If you’re ready to ramp up your book marketing efforts, engage more with your audience, or learn to do a bit of graphic design work for yourself, there are plenty of affordable graphic design options for authors. To get you started, I’m outlining the ones I use most often: Adobe Photoshop, Canva, and Picmonkey. Please feel free to mention other favorites in the comments!
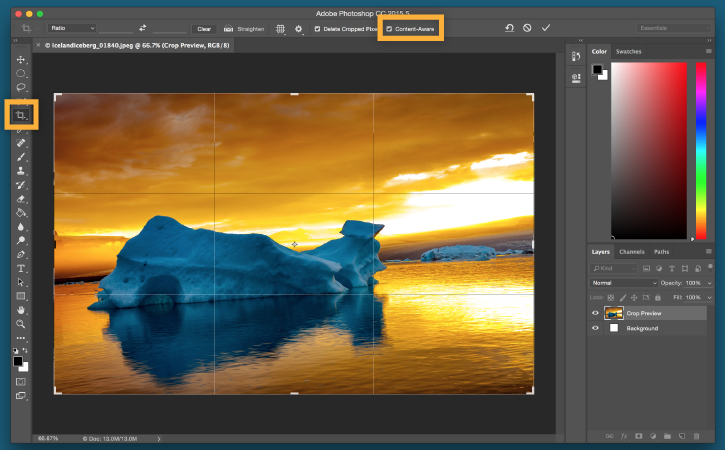
Photoshop
Of course you’ve heard of Adobe Photoshop. It’s been synonymous with photo edting for so long that its name is a verb. If you have some existing graphic design skills, or you want detailed control over the minutia of your designs, Photoshop is still the industry standard.
Photoshop Benefits
Because it allows you to work with layers, Photoshop can be useful for fine-tuning designs or working with base designs from your book cover artist to create your own graphics. It’s by far the most flexible–and the most complex–of the options I’m presenting here.
There are virtually no limits to how extensively you can edit a design in Photoshop, the size of the canvas, or the resolution. Your design is yours, in all its separate parts. If you save a graphic and realize you need to tweak the font size or delete the sale tag, it’s easy to pull up and manipulate without having to re-download a final version. Photoshop allows you to make extremely fine edits to photographs and graphics, so that they are almost undetectable. (Be careful, though, it can be addictive!)
Photoshop Drawbacks
Difficulty level = expert.
With great power, comes great confusion.
Spider-man’s accountant
Because of its complexity, Photoshop is the hardest design tool to use, particularly for beginners. If you’ve never used an Adobe design product before, the controls aren’t super intuitive, and there’s a pretty steep learning curve. You may find yourself spending half your design time watching YouTube videos to master it.
That’s a worthwhile investment if you want lots of control over your designs, or you’re planning to do significant edits (beyond built-in web filters and simple touch-ups) to your photographs. If you need graphic design or photo editing capabilities for purposes beyond supporting your writing, Photoshop could be your thing. If not, you might want to experiment with one of the web-based options instead.
Photoshop Elements is a slightly trimmed down version of the software that provides more help to new users, and is a good compromise for beginners who want both ease of us and flexibility. It should suit most authors’ purposes nicely.
Text limitations. If you’re using Photoshop for anything other than graphics with a few lines of text, the program starts to struggle and may give you fuzzy, hard-to-read results. For more text-intensive pieces (like a PDF version of your newsletter, sell sheets, or even book interiors), you’ll also want to get Adobe InDesign, which allows for better integration and flow of text and images.
Try Photoshop
Adobe Photoshop CC (the full version) is available through the Creative Cloud photography plan for around $10/month and includes the companion LightRoom photography editor as well as all updates. If you need multiple Adobe products (like InDesign, Adobe Stock, Illustrator, etc.), there are more comprehensive plans for $30-50/month. Or, you can choose to fully license the easier-to-navigate Photoshop Elements software for a one-time fee of just under $100.
Like most software purchases, the monthly subscription option means you can cancel anytime and you’ll always have the most up-to-date version of the software. With the full license, you’ll own the current version forever without having to pay again. It all depends on how extensively you’ll be using the software and for how long.
Canva
Canva is my current favorite web-based design program for most things. More fully-featured than a photo editor, Canva’s specialty is pre-made social media and other graphic templates that it’s easy to customize as your own. You can choose a template and customize everything from the colors to the text to the photograph. Or you can start from scratch and design your own using the simple drag and drop features.
Canva Benefits
Canva is easy and intuitive to use, and the stock templates are generally well-designed. It’s a great place to get ideas and to learn what works (and doesn’t) with social media designs in particular. If you keep things simple–and you should–you can create or customize designs very quickly. Then download them to your computer to post wherever needed.
Canva lets you upload and store your own photos, book covers, etc., to use over and over as often as you like. You can also take advantage of free or low-cost stock photography, icons, and graphics. It even has some book cover templates built in so you can quickly envision how a concept will look or build an inspirational cover to spur on your writing. (Again, I recommend caution when designing your own covers for publication – it can be really risky to publish a less-than-professional cover).
Another huge benefit of Canva for marketing is the Brand Kit, available with the Pro subscription. See details in the Pro section below.
Canva Drawbacks
Almost all my complaints about Canva come down to working with photos and user-uploaded graphics. There are only basic photo editing tools in Canva: about the same ability to edit you’d find on a simple phone app. You can apply a few basic filters (think Instagram), and adjust things like saturation, contrast, and warmth. But you can’t easily touch-up a photo the way you can with PicMonkey (see below) or Photoshop.
And: photo grids. Ugh. Canva uses grids and frames to apply your photos or artwork to a design. It takes a minute to figure out how to use these, but it’s pretty simple once you do. And if the design you have in mind fits one of their (many) pre-made grids exactly, you’re golden. But other than increasing the spacing between pictures (which, oddly, does not create a matching border around them), the grids aren’t adjustable. You can’t change the dimensions to make one frame wider and the others narrower, for example — which can be really frustrating when you’re working with preset graphics. Like book covers.
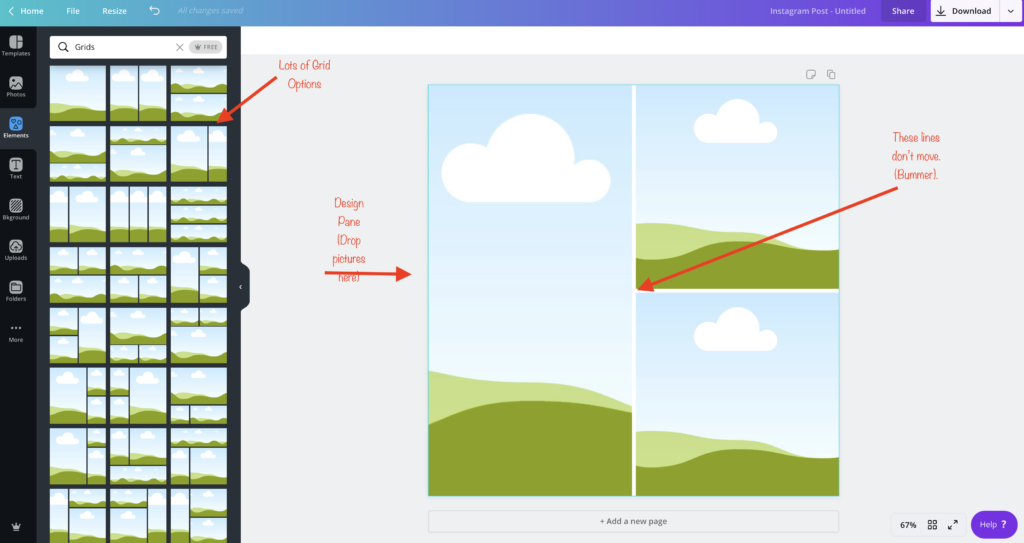
You also can’t apply a frame to an existing object in your design. You have to add the frame, and then drag the picture or object into it. And again, if the frame or border you happen to like is square, you can’t apply it to a rectangular book cover (you can adjust which part of the book gets cut off but that’s about it).
Example: Say your design calls for a collage of pictures–maybe you’re doing a promotion with other authors and you need six picture openings for headshots and book covers. You can’t add or delete picture openings – too bad if you can only find a grid with four or eight openings – nor can you change the size or proportions of the openings within a grid. So if the headshots need to be short and square but the book covers need to be taller to see all the text–you’re out of luck. You can add each photo and book cover to your design manually, of course (without using the grids), but that requires a lot more work and you’ll almost never get them aligned perfectly. For quick, easy collages that allow you to quickly adjust proportions, I recommend PicMonkey.
NOTE: With both Canva and Picmonkey (as with pretty much any online photo editing software), your completed graphics are only exportable as flat files (.jpg, .png, etc.)–not in layers. So if you made a beautiful ad only to discover that your text is too big or the color is a little off, you can’t tweak your downloaded file on your computer. You’ll have to go back to the program, make changes, re-download, and save over your previous file.
This is minor, but you should know that Canva works a little differently than you might be used to when it comes to file retention/saving. If you open a design to edit it, your changes are automatically saved to the original file and you can’t revert back–except by clicking ‘undo’ over and over. Changing the file name at the top doesn’t create a new copy (like a ‘Save As’ feature), but simply overwrites the old file with a new name. So if you want to use a previous design as the model for a new design you MUST remember to create a copy and give it a new name BEFORE you start editing. Sometimes I’ve opened a design and started tinkering before I realized that I should have made a copy. It’s workable, but can be frustrating if you are working on several designs at once and lose track of your versions.
Despite these frustrations, I still work in Canva more often than any other graphic design tool. I like having quick drag-and-drop access to my own uploaded files as well as free or inexpensive stock photography and graphics. There are enough templates that I can almost always find something that will work for what I’m trying to do. And frankly, sometimes Canva’s limitations can save me from myself and prevent me from over-designing and making something too busy.
If I need more control over the layout, I either start fresh and do everything manually or use Photoshop or Picmonkey.
Getting the Most from Canva – Pro Version
The basic version is of Canva free, and I definitely recommend starting there. But I’ve found that I really like the Pro subscription at $120/year billed annually (or $12.95/month for monthly billing) — prices at the time of this writing.
With the Pro version, you get lots more design templates, stock photos, and graphics already included. You can also resize your designs with Pro, and there’s a super-cool feature called “Magic Resize” that lets you take the same basic design and create a bunch of different copies in various sizes all at once. The content on each size will then have to be adjusted a bit to your desired layout, but it’s a huge timesaver if you want to create several items with essentially the same content.
For example: say you’re going to a conference and you need to create business cards, bookmarks, flyers, and a couple of different social media graphics with your author headshot, latest book cover, and the same basic text. You can create one version to start with and use Magic Resize to copy the background color, graphics, and text to all the other sizes. Then, just adjust each one individually as desired rather than starting from scratch.
Since I use Canva frequently, I love that the Pro version offers more folders for sorting my designs: I can sort promotion graphics by different book titles, for example, and have separate folders for quotes, edited pictures, blog graphics, joint promotions, etc.
But the best, most under-appreciated feature of Pro (in my opinion), is the Brand Kit. This tab lets you save your brand’s color palette(s) for easy access when you’re creating. If you don’t know your brand colors, just ask your book cover or website designer to send you the main color codes (Hex#) for your design. [If you’re serious about branding or just starting out, you can get some help from a professional like Color Me Kate.]
Canva’s brand kit lets you upload and save your own purchased fonts, and set default fonts for Heading, Subheading, etc. You can also save brand logos for easy access, and save templates if you create the same kind or style of graphic on a regular basis. All this makes it simpler to create a consistent look for your posts, ads, etc. Brand consistency is so important for helping readers recognize and get to know you!
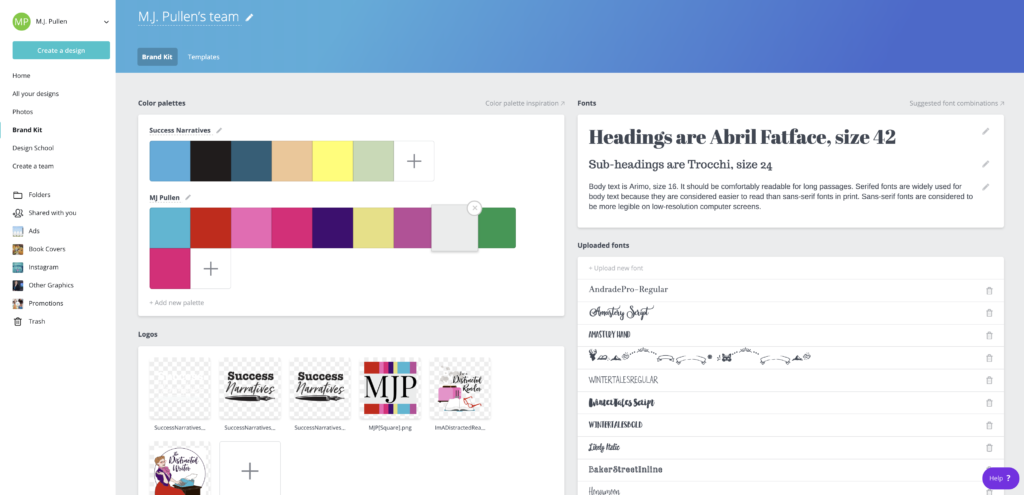
You can see in this screenshot what the Brand Kit feature looks like. My brand is still evolving, and I’m still experimenting with the best way to create visually engaging posts. But you can see that I have saved color palettes and logos for both my fiction brand and my consulting/freelance brand. I’ve uploaded some fonts that I’ve purchased over the years to help me create a look that aligns with my books.
If you start using Canva and enjoy it, I definitely recommend the Pro version. It’s easily worth the $10/month.
PicMonkey
I’ve used PicMonkey as a basic photo editor for years, and while it’s no longer my first go-to for design, its simple, easy-to-use photo editing capabilities are still strong enough that I continue to pay for the Basic plan every year in addition to Canva. (Note that I have “grandmother” pricing, see below for more!)
PicMonkey Benefits
PicMonkey is simple and intuitive, once you’ve experimented a bit to get the lay of the land. It has a pretty (occasionally cutesy, but I’m okay with that) interface, and its photo editing features are well beyond what you can do in Canva, while being much simpler to use than Photoshop.
Like Canva, PicMonkey has a drag-and-drop functionality in which you can upload your own photos to incorporate into your design. Unlike Canva, you can build collages from your own images in PicMonkey and easily delete, add, or move the frames around to customize it for your needs. If a collage design you like has 10 spaces for photos but you only have 9, simply delete the unwanted box and the spacing will adjust accordingly. If you leave a space blank, it simply won’t be there when you export to the editor (so it becomes the color of the background and you can overlay graphics onto it.) You can increase or decrease the borders between pictures, too, which is really nice when you’re trying to keep a clean look or leave room for text, etc.
The photo editor is much more robust in PicMonkey than in Canva, as well. You can do many of the same basic filters and color adjustments, but there are many more textures and overlays for photos than in either Canva or Photoshop. It’s actually a lot of fun to play with in that regard.
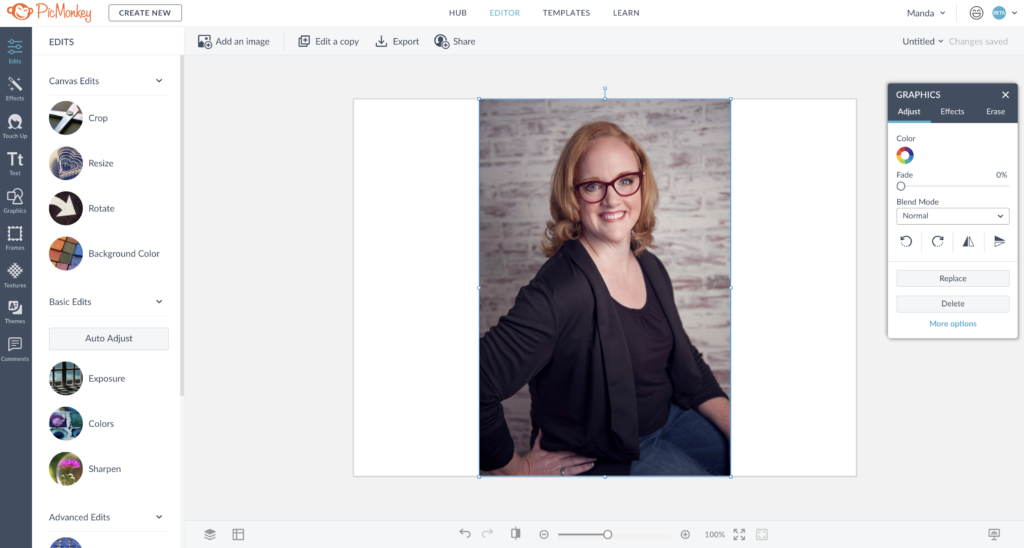
PicMonkey has touch-up features designed just for pictures with faces–these aren’t available in Canva at all, and are more advanced features in Photoshop. And while I am all about real beauty (seriously), there are times where I’m running on no sleep and need to soften the bags under my eyes a tiny bit; or when my teeth appear extra-stained in the lighting, or I forgot to put on lipstick and I look half-dead. It’s nice to be able to do quick, minor fixes that allow me to feel comfortable posting something I might not otherwise want to put out in the world–and it saves me the time of getting all dolled up like a professional model just to put up a selfie with today’s coffee mug or a book I’m giving away.
Like Canva, PicMonkey has text capabilities, a few built in graphics and some basic social media templates you can use to start your design. Their library of templates isn’t as robust as Canva’s, but they do offer lots more blank templates–so you can choose the size of the social media graphic you need and still start with a blank canvas.
PicMonkey Drawbacks
PicMonkey started out as a pretty robust free editor, but they’ve moved to a pretty strenuous pricing plan, in which you can’t do much with the free version any more. Apparently their software developers started getting these weird cravings for rent money and food for their kids. Sheesh.
The net result is that you can’t do nearly as much with PicMonkey’s free version as you can with Canva’s. There was always a premium PicMonkey option (it used to be called Royale, which made me feel fancy), and I’ve always found it worth paying for. But some early users of the free version found it irritating when features they were used to getting for free migrated to the premium version.

My formerly Royale, now “Basic” subscription price has gone up over the years too–and I’ve lost some features like the ability to use my own fonts without upgrading further–but they’ve still made an effort to grandfather in old-timers at lower pricing than the current retail. And even the retail price for Basic is lower than Canva Pro, if you need some extra functionality but not all the bells and whistles.
The newest version of PicMonkey looks and feels more like Canva, but the navigation is a little different and takes some getting used to. There are lots of cool options, but the interface can be a little overwhelming to new users.
Like Canva, PicMonkey allows you to save your own photos and artwork to the “Hub,” but it doesn’t allow you to access those uploads in the sidebar for quick drag-and-drop like Canva. Not a huge deal, unless you’re experimenting with 40 different headshots of yourself to see which one looks best on a business card. Not that I would know. I’ve heard, that’s all.
Since their pre-made template library is more limited than Canva’s, PicMonkey doesn’t have as many already-designed template options–including, notably: they don’t offer book cover templates. And while I complained about the sizing issue on Canva’s many drag-and-drop frames, so far PicMonkey doesn’t offer frames at all–except for those that encompass the entire canvas (and those also cannot be custom-sized).
Even though PicMonkey doesn’t offer a truly free version, you can pay the annual fee and get the Basic version (which has just about everything the average author/marketer could want) for about $6 a month, or $8 if you pay monthly. With the Pro version, you can use your own fonts, get unlimited storage and export as PDF (in addition to JPG and PNG already included in Basic) for $10/$12 month — the same as Canva’s Pro version. Read more about PicMonkey pricing here.
The Bottom Line for Authors
To sum up, any of these three options can be useful for authors. If you also dabble in photography, want to teach yourself more about graphic design, or don’t mind investing the extra time to learn how to get things juuuuust right, Photoshop might be a good fit for you. It’s the only option of the three you can straight-up buy, rather than doing a recurring subscription. That’s nice if you only need to do design intermittently and aren’t super worried about updates. It’s also great for working with layered files from a designer (with permission), or in combination with other Adobe products.
PicMonkey and Canva are the user-friendly, web-based options. Over the last couple of years, they’ve become similar beasts in many respects, and their pricing structures are not terribly different. So:
PicMonkey is easier to use with existing photos and gives you more options for touching up and filtering. There is much better functionality for collages and and more blank canvases for the design-minded. It’s easier to adjust the size of overlays, too. If you plan to edit lots of selfies or other photos of humans, PicMonkey beats Canva every time.
If graphic design isn’t your thing, and you’re not planning to do lots of posts with multiple pictures, Canva offers many more existing social media templates for inspiration. I also love their Brand Kit for keeping things consistent. And if you like the idea of designing your own book covers for inspiration or free giveaways online, Canva has some fun places to start.
Personally, I keep the Canva Pro plan for most design uses and brand consistency; but still find it’s worth paying for the PicMonkey basic for picture editing and quick, clean collages. As these two platforms evolve and add features, I imagine I’ll be able to put all my graphical eggs in one basket. Until then, the time I save by having both options is worth the cost.
Can’t decide? If you want to try the drag-and-drop functionality but don’t know which is better for you, I recommend trying out both of these on the monthly plan (or free version) for a few weeks to see which one suits your needs. Then switch to the annual plan for the discount when you’ve found your happy place.
Have you tried these programs and spotted features or drawbacks I missed? What is your favorite way to edit photos or create social media posts? Comment below and help out your fellow writers.
This post contains affiliate links, which means the author may receive a nominal commission for items purchased through these links. Commissions are typically a fraction of the item’s cost and do not impact your purchase price in any way. Thank you for your support!
Keep Writing.
Get tips, publishing perspectives and occasional rants delivered to your inbox. Sign up for my newsletter (click the “Tips for Writers” checkbox). And don’t forget to Like & Follow The Distracted Writer Facebook Page for updates and tips in your feed.
Sign up for M.J’s Mailing list & read Late for the Holidays FREE! Sign Me Up!